|
Shadow Scalloped
Frame Tutorial
Tutorial by Storme
Designs.

I came across this technique, when
I was making a small quilt square. I thought
I would put it online for you to
try. I haven't had time to play with it further
and try
different sizes etc. I'm sure
someone probably has and has a tute, but I
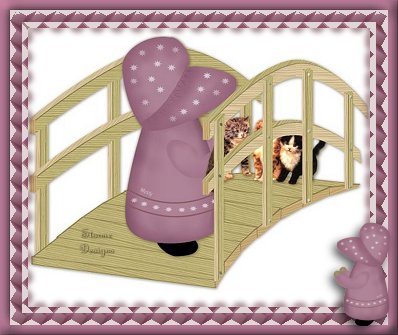
haven't seen one yet. The frame at
the top of the page is just one example.
||||||||||||||||||||||||||||||||||||||||||||||||||||||||||||||||||||||||||||||||||||||||||||||||
You will need only
Paint Shop
Pro, a graphic and
the
Redfield
Jama Filter. The Jama filter is freeware and
you can
download it at the site.
This tutorial assumes you have some
knowledge of PSP.
It was created in
Paint Shop 7.
||||||||||||||||||||||||||||||||||||||||||||||||||||||||||||||||||||||||||||||||||||||||||||||||
Please save your graphic often as you work in case
your
computer shuts down for any reason.
||||||||||||||||||||||||||||||||||||||||||||||||||||||||||||||||||||||||||||||||||||||||||||||||
Choose your graphic, then hit you
shift and D key together to make
a duplicate of your picture and
close your original. This keeps your
original unaltered for future use.
You could also copy and paste
as a new image.
||||||||||||||||||||||||||||||||||||||||||||||||||||||||||||||||||||||||||||||||||||||||||||||||
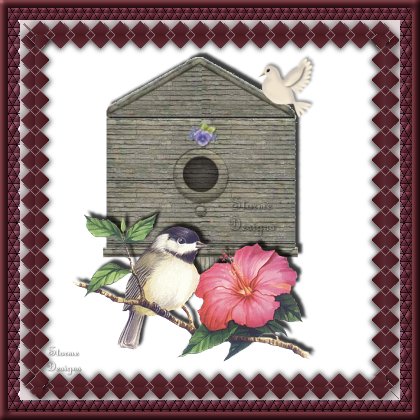
You can size the picture to the
size of your choice. When
I first tried this, I was using a
130 by 130 graphic, and it came good
as below.

I tried it one a large image and
the effect was not that good.
Another problem is the size of your
border. The effect seems to work
best on a thin border.
Therefore I suggest using a smaller graphic.
The one at the top was about 350 x
330. I suggest opening one
and resizing it to 300 x 300 or
close to that.
Choose a color from your picture
for your border or what you like.
Next we are going to click on Image
and Add Borders.
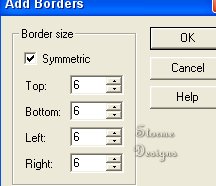
I chose size 6 for the frame at the
top. with a matching pink color.
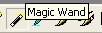
Next select your border with your
magic wand.
Now go to Effects, Plug-ins and
choose Jama 3d. Click
on the bottom box, where it says
Last used on the graphic
below and select Tesselation and
click on the Apply button.
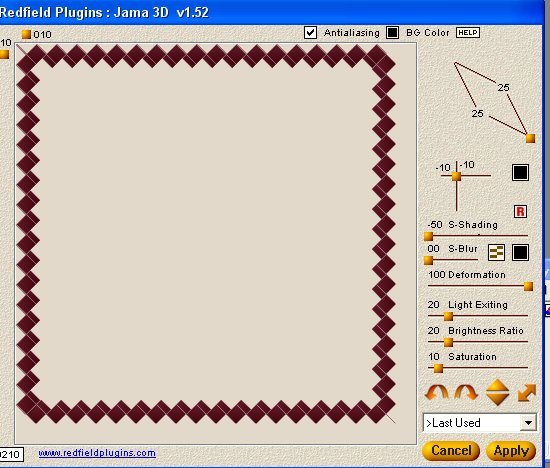
Your border will now look like the
one below.

You Can leave the border colors as
is or change the lighter rear border
color to a lighter matching color
to your border. If you want to
change it, you click on your magic
wand again and select part of the
lighter border. Hold down
your shift key and select each outer
triangle. If you select a
part of your graphic by mistake, just go to
edit, undo and undo and re-select.
Flood fill your selections, when
done with the lighter color of your
choice. If there is an extra
line in the corner of your border,
you can erase it or paint over
it with your border color.
With your graphic still selected,
go to Effects, 3D
and select Drop Shadow. My
settings are below.

Vertical and Horizontal at 4,
opacity at 76 and Blue 8.5.
You can use a black shadow or
change the color to a darker
shade of your original border
color. I think the matching color
looks better.
Now select your Drop Shadow again
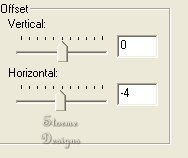
The opacity and blur remain the
same, but your vertical is now 0
and your horizontal is minus 4.
You can see the edge effect or
scallop look. If for any
reason yours didn't come out as above,
play with your settings a little.
That's it! You're done!
On the one on the top I added
another border and redid
the border same as above for the
double scalloped look.
I then added a final border with an
inner bevel.
||||||||||||||||||||||||||||||||||||||||||||||||||||||||||||||||||||||||||||||||||||||||||||||||
Below has a border added and Eye
Candy's glass bevelled it.
Then used a white border and applied
the Graphics Plus
Plug ins Kalaidescope effect. I
then added two more borders
and bevelled with the Eye Candy glass
filter again.

I used the same Redfield
Tesselation for below,
but played with the border. A
separate tutorial explaining the border
below is at
Diamond Tweed Frame Tutorial
For the image below, I used another
Redfield setting
and just played.


The set and graphics on this page
can be copied with a link
back to our site with the logo
below, http://mystyqcat.tripod.com/

This tutorial can be copied intact
without the backgrounds with
credit to Storme Designs,
||||||||||||||||||||||||||||||||||||||||||||||||||||||||||||||||||||||||||||||||||||||||||||||||
Check our main Tutorial page for
new Tutorial listings at
Storme
Millennium Tutorials.
We have a new Descriptive Index of
our Tutorials at
Tutorials.
Our Site Index is at
Storme Millennium Index.
[Care][Help][Parlor][Storme
Central]
[Millennium]
[Storme II][Den][Yard][Shelf][Garden][MadCat]
[Game][Patriotic
Porch][Study]
[Patch][Attic]
[Ring][Vacation][Furship]
[Designs][Adoptions]
[web services][Halloween][Birthday][Loft]
[Snow]
[Island][Hostess][AdoptionPorch][Quilt][Gifts]
[Banners]
[Ring]
[Graphics]
[Lists][Award][Links][Garden
Friends][Haunted
Courthouse][Library]
[Tutorials][Fireworks][Cat][Island2][GOF
angels][GOF
gallery][Index][Add
link][Loft2][GraphicII]
[Mysty's
Place][Postcards][GraphicII][MahJong][Cards][Lounge][Gof
Birthday][Balcony][Island2]
[Realtor][Samples][Welfare][Condo][Care][Cat][Anniversary][Stratford][Nest][Help
Links]
[GraphicII] [Index][Postcards][Loft]
|